You will need:
1. Thick cardboard
2. Box cutter
3. White glue (wood)
4. Hot glue
5. Ruler
6. Paint tape
Part 1.
Draw the image
of you future nightstand (how you want it to look from the front) on a cardboard, cut it out.
Using the first form as a pattern outline and cut 3 more forms like this, number them.
Also you will need one more for the back but outline and cut out only outside figure not touching the inside -it will be the fifth figure.
Connect figures number 2,3 and 4 with paint tape and draw holes for future ribs 4 mm width and half of the width of you form heights. For example, if I have the width of my form 5 sm, I will need 2,5 sm. size of my hole in heights.
Cut holes out, try to make them uniform.
Place figure 2 on figure 1 and outline holes. Then do the same with figure 5.
Part 2.
You need to make ribs with length = width of your nightstand-width of your cardboard*2.
I had the width of my nightstand 50 sm minus double width of cardboard (4mm*2=8mm), so I had the length of ribs 49,2 sm.
The width of the rib should equal to the width of your figure.
First draw ribs on a cardboard and cut them out. Do not forget to leave 3 holes in each rib using the same principle as with figures. Leave equal distance between holes.
Part 3.
Connect figures 2,3 4 with ribs using holes.
You should now have a volume of your future nightstand.
Take each rib and glue it to the construction with wood glue or you can use hot glue. Then make the ribs firmer by additionally enforcing the joints with paper and wood glue:
Glue the front (number 1) and back (number 5) panels to the construction using hot or wood glue:
Part 4.
Measure and cut out inside walls, glue them to the construction.
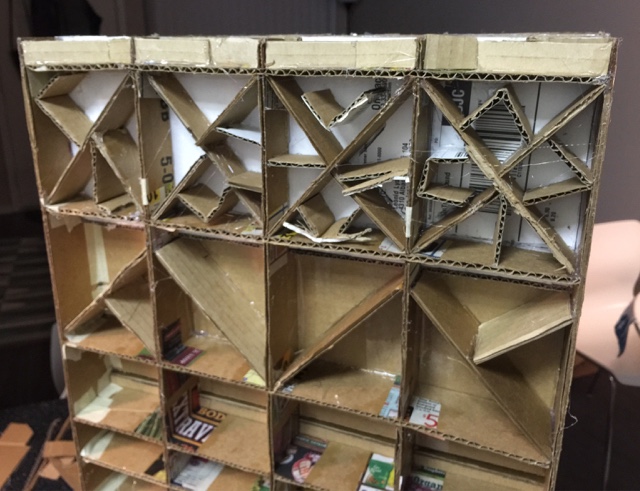
Enforce corners with additional ribs glued in diagonal order. It will make it sturdy.
Then measure and cut out outside panels of the construction. I had two 60 by 50 -right and left sides, one 50 by 50 -bottom, 3 narrow and 1 wider part of top. It is better to measure the top parts on place. Glue them to the construction. I used hot glue here.
Enforce the corners with masking tape.
Part 5.
Sand all corners and smooth everything you do not like.
Use paint tape to cover all corners inside and outside.
Part 6.
Mix wood glue with water (2 parts of glue and 1 part water). Glue paper pieces to the sides of your construction inside and outside in 2 or more layers (
papier-mâché principle). Let the glue dry between each layer.
Part 7.
Smoth some defects with sanding paper again.
Cover the product with paint, adhesive tape or wallpapers. I have chosen yellow and white acrylic paint.
The same method I used for the drawer. Do not forget to reduce drawer sizes for 1 cm from each side.
Good luck!